Reverse around a corner or ‘left corner reverse’ as it’s also known, requires the driver to pass a minor road at a junction, stop and then reverse into the minor road. It is a manoeuvre that was frequently requested during the driving test but is no longer carried out. It is however still a useful manoeuvre to learn for everyday driving.
The reverse around a corner has been replaced by the pulling up on the right and forward bay parking manoeuvre. Why Reverse Around a Corner? Once you have passed the driving test, you may perform this exercise from time-to-time for turning the car around. For the driving test however, the reverse around a corner is a manoeuvre that is used to show the driving examiner that you have three key skills, these are:
- Accuracy – The examiner will be assessing your ability to reverse around the corner, not touching the kerb or straying too far into the centre of the road.
- Control – The examiner will be judging your ability to keep the car at a slow, controllable speed by use of clutch control.
- Observation. The examiner will be assessing your observational skills to ensure you are aware of what is going on around you at all times.
For best chances of success, attempt the reverse around a corner with a step-by-step process and by use of reference points. This tutorial will teach you how to reverse around a corner using a successful technique used by qualified driving instructors. The reverse around a corner tutorial is as follows:
1. Park on the Left
- The examiner will ask you to park up on the left before the junction you are going to reverse into. When the examiner asks you to park up, ensure you check your main mirror, your left mirror and signal to the left before stopping.
- Once the car has stopped, cancel the indicator, apply the handbrake and select neutral.
- The examiner is now going to ask you that they would like you to demonstrate the reverse round a corner manoeuvre. You’ll be required to pass the junction that you will be reversing into and stop on the left.
- Select first gear, check your main mirror, right mirror and the blind spot to your right, signal and move off into the position diagram – ‘Prepare the car’.
- As you are passing the junction that you will be reversing into, ensure it is free from obstructions such as road works.
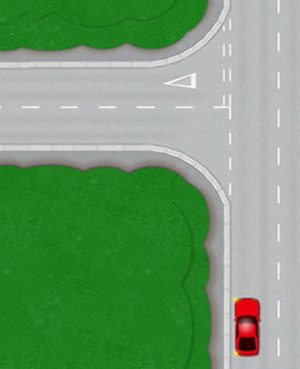
2. Prepare the Car
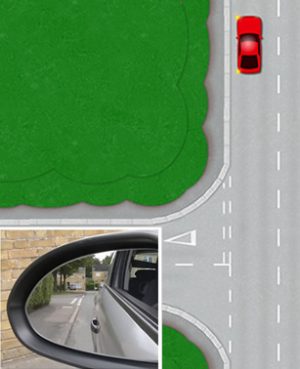
- Before stopping on the left, check your main mirror, your left mirror and signal to the left, just as you would normally park up. Signal around halfway across the junction – do not signal too early as it’ll confuse road users believing you are making the turn.
- Stop a little further away from the kerb than normal – around the width of the steering wheel, or around 45 cm should be adequate. This is because if you park too close to the kerb, you have a greater chance of hitting it. If you feel you have stopped too close to the kerb, tell the examiner you are going to pull forward slightly to correct this. If you do so, always perform observational safety checks and signals beforehand.
- When you stop, ensure the car is straight and parallel with the kerb and that your steering is also straight. You don’t want to be setting yourself unnecessary challenges by leaving the car and wheels at odd angles.
- Once you have stopped, cancel the indicator, apply the handbrake and immediately select reverse gear. You must select reverse gear immediately as this informs other road users of your intentions.
- Now look into your left mirror – look at the straight kerb and the distance you are from the kerb. Take a mental picture of this, as this is what you want it to look like on the other side of the corner.
3. Point of Turn
- In a moment, you’ll straight reverse to the point of turn, but before doing so, all round observations must be completed. If there are any cars or cyclists approaching, wait till they have passed. If there is a delay between your observations and moving the car, all-round observation should be completed again. It only takes a few seconds for the situation to change.
- When clear, look in the direction of travel – out of the rear window and slowly begin to move backwards. Do not use the mirrors when starting to move backwards, this will fail your test. Once moving you can now alternate observation, but always start moving the car by looking in the direction of travel.
- After you begin moving, frequent checks should be made into the left mirror to gauge your distance from the kerb, along with frequent checks out the rear window, other mirrors and out the front. That’s a lot of looking around, so it’s essential you keep the car very slow. If you think of a slow walking pace, that should give you an idea. This speed can be controlled by clutch control and the slower you keep the car, the easier the manoeuvre is.
- This part of the manoeuvre is quite safe, though if the road is quite narrow, stop when other road users are approaching to let them pass and continue again when all clear. Also be careful of pedestrians, they have a habit of walking behind reversing cars.
- Whilst reversing, try and keep an equal distance from the kerb. Remember, steer towards the kerb to go towards it and steer away from the kerb to get away from it.
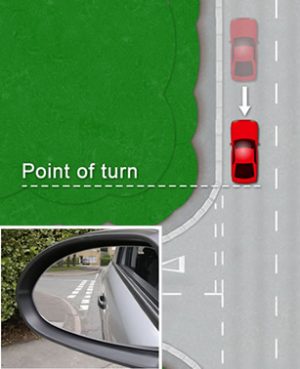
- You need to use reference points to find the point of turn. A good indication is to look in your left mirror, you will see all the straight kerb gone, with only the corner in the mirror – that’s the point of turn! When you get there, stop the car.
4. Keeping to the Kerbline
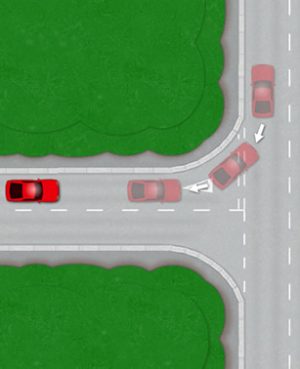
- As you begin to move backwards, you will need to steer left to go round the corner. This is going to make the front of your car move out into the road. Therefore before moving, look all-round, but this time also check in your right blind spot to ensure all is clear (the examiner will be checking this). Once you are happy all is clear, look out the rear window and proceed backwards.
- How much left steer really depends on how sharp the bend is, but to get yourself off to a start, give the wheel one complete turn to the left.
- Going round the corner is the most difficult part. Keep your car extra slow at this point. Remember the kerb that you could just see in your left mirror at the point of turn? Keep that corner view of the kerb in the mirror. If you lose sight on the kerb, then you are drifting too far into the road, so steer towards the kerb to bring it back into view.
- As you round the corner, you are looking for that metal picture you took right at the start – straight parallel car and kerb. As it begins to look like this, straighten your wheel up. It is then a case of a simple straight reverse until the examiner asks you to stop. Once you have stopped, apply the handbrake and select neutral.
Tips on How to Complete the Reverse Around a Corner
Listed below are many tips for correctly completing the reverse around a corner manoeuvre.
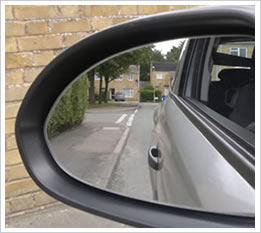
Reverse round a corner view in mirror
This is the view of the left door mirror when you have parked up on the left ready for the reverse round a corner manoeuvre. Continue reversing until all the straight kerb has gone and keeping the same distance from the kerb. When all the straight kerb has gone (see point of turn below), you will have reached the point of turn.
At all times keep the kerb in the left mirror, if you can’t see it, you don’t know where it is. Sit up nice and high, this will give you the best view of the kerb. This view of the kerb should look similar when you finish the manoeuvre on the other side of the corner.
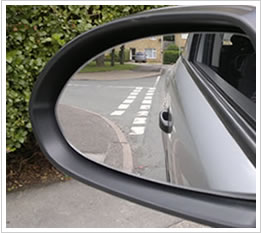
Point of turn
The straight kerb has all gone from the left door mirror and you can only see the curve of the corner in your mirror. You will now know the rear of your car has reached the start of the corner called the ‘point of turn’ ready for turning. It’s best to stop the car when the point of turn has been reached.
This helps to break the manoeuvre down into step-by-step phases. If you feel you have over-shot the point of turn by too much (you can no longer see the kerb in your mirror), explain to the examiner that you would like to pull forward slightly to adjust. By correcting yourself like this, it may possibly lead to a minor fault, but it is of course better than failing the entire test.
-
Speed
Keeping the car as slow as possible will make the reverse round a corner much easier. It will allow you to constantly observe in all directions and to be accurate in terms of a safe distance from the kerb.
-
Observation
You can perform the best reverse round a corner ever, but not enough looking around will fail the driving test. Constant all-round observation is a must, especially at potentially hazardous moments such as the point of turn. Although tempting, don’t just stare at the left mirror. Lack of all-round observation will fail your test. Be particularly aware of looking out your right window into the blind spot just before the point of turn and during reversing around the corner.
-
Steering
Whilst reversing, you can if you find it easier, steer with one hand. Your hands should ideally be situated at the top and keeping within the quarter to three position. One of key skills to this manoeuvre is quick reaction. If the kerb starts to disappear then steer towards the kerb to bring it further back in view. If it gets closer, steer away from it. Taking too long to react may result in hitting the kerb or ending up on the other side of the road. Both of which are likely to result in a test fail.
-
Approaching vehicles and pedestrians
As this manoeuvre is reversing, it is potentially dangerous as it is difficult to see. Stop for any vehicles and cyclists that are attempting to go round you. If any pedestrians come close to your car, stop allow them to pass before you continue. Be particularly cautious as you are reversing around the corner, the front of your car is hazardous and straying more into the road. If any vehicles or cyclists are approaching from any direction during this phase, stop the car and wait for them to pass. Generally, as your vehicle exits the main road into the side road, you can continue without the need to stop – unless a vehicle approaches from behind.
-
Readjusting
If you feel that you have overshot a reference point for example, getting too close to the kerb or too far, don’t be afraid to readjust. If you need to pull forward, inform the examiner what you are doing, and ensure you do all the safety checks before doing so. Readjusting like this may possibly gain you a minor fault, but it’s better than risking hitting or mounting the kerb which is highly likely to result in a test failure.
-
The kerb
Essentially, you can get as close to the kerb as you like, providing you just don’t hit it. When you have finished the reverse round a corner manoeuvre, how close you finish to the kerb depends on the width of the road you are reversing into. You don’t want to impede other road users, so if the road is quite narrow you will need to finish close to the kerb as you don’t want to prevent another vehicle from driving round you.
-
Additional mirrors
The use of additional mirrors attached to the side mirrors will gain you extra visibility. They may also allow you to see the kerb easier, giving you better control over the manoeuvre.
-
Seat belt
Whilst reversing, you are legally permitted to remove your seat belt. If you feel that whilst performing the reverse round a corner manoeuvre your seat belt is restricting you from moving and observing in any way, consider removing it. Remember though, if you do pull forward to correct or forget to put it on when you drive forward after completing the manoeuvre, you will fail your test.
Other manoeuvres taken in the driving test
Listed below are the three other manoeuvres that may be requested by the examiner during a test.

Very useful
Thanks Saritha,
It is rather long, but at least it covers every possibility.
very useful
Very good tutorial
Great site for a PDI
Glad you find it useful Dave.
Best explanation I’ve seen.
I was told this isn’t in the test and not practiced anymore. That’s what my instructor said, so we’ve never gone through it.
Hi Ricky,
Yes, you’re right. As it says at the top of the page, reverse around a corner has been replaced with the pulling up on the right and forward bay parking manoeuvres. Not too sure why they removed it from the driving test though, it’s a very practical manoeuvre that is used in real life driving. This tutorial has remained here just in case anyone wants to learn it if they think it may benefit their driving in any way.